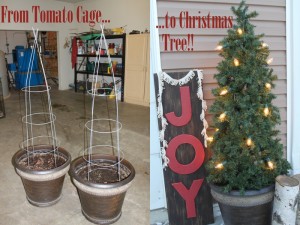
I’ve wanted to build one of these tomato cage Christmas trees forever. This year, I was determined to make it happen. Let me share with you how SUPER easy this was to do…and inexpensive compared to what you would spend to purchase one already potted and lit.
First, I found a couple tomato cages at Lowe’s. I bought these last year during the Christmas season; I just asked where they stored out-of-season gardening supplies and the clerk led me right to them.
I didn’t bother to secure the cages into my pots as I assumed the weight of the greenery would keep them in place. These pots already held soil from summer plantings so I just turned the cages upside down and placed them on top of the soil in the pots.
Next, I secured the tops with wire to make a pointed top for my tree (Fireman always has a roll of wire like this in his stash. It’s one of the reasons I love him.)
I purchased 9′ length garland from Michael’s for $3 a bundle. I purchased 10 bundles; each tree needed 4 1/2 bundles so I ended up with 1 extra.
Using a wire cutter, I snipped off more wire to secure the garland to the tomato cage as I worked.
As I unwrapped each garland, I fluffed the needles and then, starting at the bottom, I slowly wrapped the garland around the tomato cage, securing it to the cage with wire as I went.
Our Mastiff was very curious about this process ~ and thrilled to have someone hanging out with him in the garage. He’s also shy.
Fluffing needles is an important step in making the Christmas tree look full and pretty. ( I don’t know why I always look so serious in these process photos!)
When I reached the top, I secured the final length with wire, did a little more fluffing, and voila! SO easy!
In our Christmas boxes this year, we came across four boxes of 25′ lights that had never been used. Although I initially thought I would wrap my trees with small white lights, I ended up using the boxed sets instead, which are much larger bulbs. I used one 25′ length of lights per tree.
When it’s dark outside ~ which is from just past 3pm all the way until 10am this time of year! ~ the large lights make for a very warm welcome as we pull into our garage.
I’m having fun with our handmade JOY sign, too…..Fireman and I made it out of old barnwood planks and wooden letters we had on hand. Easy and inexpensive: Just a few of my favorite things ~
A very Merry Christmas from our home to yours 🙂


 Vintage Market ~ Sneak Peek
 A Bench for the Dining Room
 DIY Hand-Painted Sign with Projector